clover pom pom maker instructions
Welcome to our guide on the Clover Pom Pom Maker‚ a revolutionary tool for creating fluffy pom poms quickly and effortlessly. Ideal for crafts‚ DIY projects‚ and adding a personal touch to home decor and accessories.
Overview of the Clover Pom Pom Maker
The Clover Pom Pom Maker is a versatile crafting tool designed to simplify the process of creating fluffy‚ uniform pom poms. Available in various sizes‚ it allows crafters to produce pom poms of different diameters‚ making it ideal for DIY projects‚ home decor‚ and accessories. The maker features a plastic disk with arms that hold the yarn in place‚ enabling easy wrapping and cutting. Its compact design and user-friendly mechanism make it accessible for crafters of all skill levels‚ ensuring professional-looking results with minimal effort. This tool is a must-have for anyone looking to add a decorative touch to their creations.
Importance of Using the Clover Pom Pom Maker
The Clover Pom Pom Maker is an essential tool for crafters‚ offering precision and consistency in creating pom poms. Its design ensures evenly wrapped yarn and secure knots‚ preventing pom poms from falling apart. This tool saves time compared to traditional methods‚ making it ideal for projects requiring multiple pom poms. Whether for home decor‚ accessories‚ or gifts‚ the Clover Pom Pom Maker delivers professional-quality results‚ enhancing the overall appearance of any craft project. Its ease of use and reliability make it a must-have for both beginners and experienced crafters seeking efficiency and perfection.

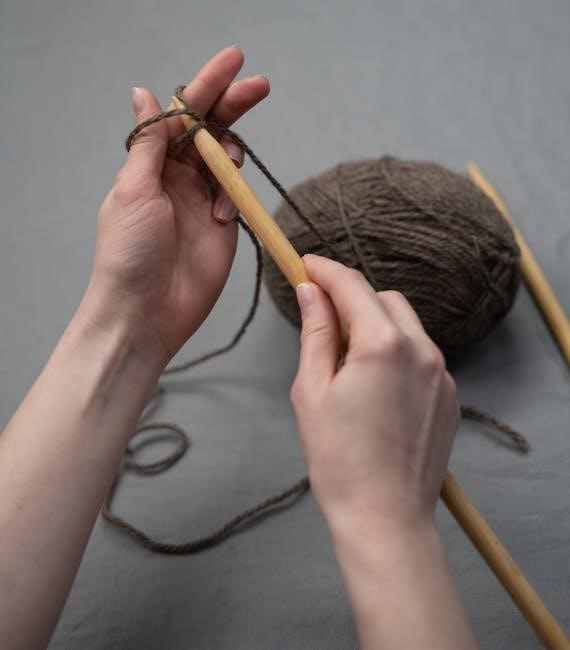
Materials Needed for Making Pom Poms
Gather your tools and supplies‚ including the Clover Pom Pom Maker‚ yarn of your choice‚ sharp scissors‚ and a strong thread or string for securing.
Yarn Selection for Different Pom Pom Sizes
Choosing the right yarn is crucial for achieving desired pom pom sizes. Thicker yarns create larger‚ fluffier pom poms‚ while thinner yarns produce smaller‚ tighter ones. For a standard size‚ medium-weight yarn like Lion Brand Vanna’s Choice works well. Experiment with different textures and colors to add variety. Worsted weight yarn is ideal for most projects‚ but bulky yarn can make oversized pom poms for decorative accents. Always consider the intended use of your pom pom when selecting yarn to ensure the best result. Proper yarn choice enhances both appearance and durability.
Scissors and Other Essential Tools
Sharp‚ pointed scissors are crucial for cleanly cutting yarn when using the Clover Pom Pom Maker. Dull scissors can result in uneven cuts‚ affecting the pom pom’s appearance. Additionally‚ a strong thread or yarn needle is necessary for securing the yarn tightly around the pom pom to ensure it holds together. Optional tools include a measuring tape for consistent sizing and a comb for fluffing the pom pom. Having these tools ready ensures a smooth and efficient crafting process‚ leading to professional-looking results. Proper tools are key to achieving a polished and durable pom pom.
Step-by-Step Guide to Using the Clover Pom Pom Maker
Learn to create perfect pom poms efficiently with the Clover Pom Pom Maker. Start by opening the maker‚ wrapping yarn evenly‚ then cutting and securing tightly.
Opening and Preparing the Pom Pom Maker
To begin‚ grasp the Clover Pom Pom Maker and gently pull the four arms outward until they are fully extended and aligned straight. This action ensures the maker is open and ready for use. Next‚ ensure all parts are clean and free from any obstructions. Properly aligning the arms is crucial for even yarn distribution. Once open‚ the maker is prepared to start wrapping the yarn‚ setting the foundation for a perfectly round and fluffy pom pom. This step is essential for achieving professional-looking results.
Wrapping the Yarn Around the Maker
Secure one end of the yarn to the Clover Pom Pom Maker. Wind the yarn evenly around both sides of the arms‚ moving in a consistent direction to ensure full coverage. Use worsted weight yarn for optimal results. Be careful not to wind too tightly‚ as this can cause unevenness‚ or too loosely‚ which may result in a sparse pom pom. Maintaining even tension is key to achieving a uniform and fluffy finish. Proper wrapping ensures the final product is balanced and visually appealing‚ setting the stage for a perfect pom pom.
Cutting and Securing the Yarn
Carefully insert sharp scissors into the gap between the arms of the Clover Pom Pom Maker. Cut the yarn evenly along the edge‚ ensuring not to cut too deeply. Once cut‚ use a strong thread to tie a secure double knot around the center of the yarn bundle. This step is crucial for keeping the pom pom intact. After tying‚ gently separate the two halves of the maker and remove the pom pom. Trim any loose ends to create a neat‚ professional finish. Proper cutting and securing ensure your pom pom stays fluffy and well-shaped.

Tips for Creating Perfect Pom Poms
Use sharp scissors for precise cutting and ensure even yarn distribution. Secure with a strong knot to maintain shape and prevent the pom pom from falling apart.
Ensuring Even Yarn Distribution
To achieve a full and balanced pom pom‚ wind the yarn evenly around the Clover Pom Pom Maker; Avoid overlapping or leaving gaps‚ as this can cause unevenness. Start by securing one end of the yarn and wrap it tightly but not overly so‚ moving consistently across the arms; Once wrapped‚ use sharp scissors to cut through the yarn at the gap between the arches. Ensure all strands are cut cleanly and evenly. This step is crucial for maintaining the pom pom’s shape and preventing it from appearing sparse or lopsided.
Securing the Pom Pom with a Strong Knot
After cutting the yarn‚ securing the pom pom with a strong knot is essential to prevent it from falling apart. Use a sturdy thread or yarn to tightly wrap around the center of the yarn bundle. Tie a double knot to ensure stability. For added security‚ you can wrap the thread around the bundle multiple times before tying the knot. This step ensures the pom pom remains intact and maintains its shape. Properly securing the knot is crucial for durable and long-lasting results with your Clover Pom Pom Maker projects.

Troubleshooting Common Issues
Common issues include uneven yarn wrapping or pom poms falling apart. To fix‚ ensure tight‚ even wrapping and secure with a strong double knot for durability.
Why Your Pom Pom Might Fall Apart
Your pom pom might fall apart due to loose yarn wrapping‚ insufficient yarn‚ or a weak knot. Ensure the yarn is tightly wound and secured with a strong double knot. Blunt scissors or uneven cutting can also cause fibers to separate. Additionally‚ improper handling of the maker or not tightening the yarn adequately during wrapping may lead to a pom pom that unravels easily. Proper technique and attention to detail are key to creating durable‚ long-lasting pom poms that stay intact.
Fixing Uneven or Loose Yarn Wrapping
If your yarn wrapping is uneven or loose‚ start by carefully unwinding the yarn and re-wrapping it tightly around the Clover Pom Pom Maker. Ensure each layer is evenly distributed and not overlapping excessively. Use a pair of sharp scissors to trim any excess yarn for a uniform appearance. For loose wrapping‚ gently tighten the yarn as you go‚ making sure it’s snug but not too tight. This will help create a balanced pom pom that is both fluffy and secure‚ ensuring a professional finish for your project.

Customizing Your Pom Poms
Elevate your pom poms by experimenting with different yarn colors‚ textures‚ and sizes. Add decorative elements like beads‚ sequins‚ or metallic threads for a personalized touch.
Using Different Yarn Colors and Textures
Experiment with various yarn colors and textures to create unique pom poms. Use vibrant hues for bold statements or pastel shades for softer looks. Try chunky‚ metallic‚ or glitter yarns for added visual interest. Mixing different textures‚ like wool and acrylic‚ can add depth and complexity to your designs. Consider seasonal themes‚ such as metallic yarns for holidays or natural fibers for rustic charm. The Clover Pom Pom Maker works with any yarn type‚ making it easy to customize your creations to suit any project or preference.
Adding Decorative Elements to Pom Poms
Elevate your pom poms by incorporating decorative elements like beads‚ sequins‚ or glitter. Thread beads onto the yarn before wrapping or attach them after securing the pom pom. Use fabric paint or spray for a metallic finish. For a festive touch‚ add small bells or rhinestones. You can also wrap ribbon or lace around the center for a polished look. These embellishments make your pom poms stand out‚ perfect for seasonal decor‚ gifts‚ or themed crafts. Get creative and turn your pom poms into unique‚ eye-catching accents for any project.
Projects You Can Make with Clover Pom Poms
Clover pom poms are perfect for DIY home decor‚ crafting accessories‚ and seasonal decorations. Use them to create colorful garlands‚ festive ornaments‚ or unique gift embellishments. Add charm to hats‚ scarves‚ and bags. Pom poms also make delightful additions to party decorations‚ wreaths‚ and kids’ toys. With the Clover Pom Pom Maker‚ you can easily craft these creative projects in minutes‚ bringing a personalized touch to your home and gifts. Let your imagination shine with these versatile‚ fluffy accents!
DIY Home Decor Ideas
Transform your home with colorful pom poms! Use them to create vibrant garlands‚ decorative wreaths‚ or unique wall hangings. Add fluffy accents to curtains‚ pillows‚ or rugs for a playful touch. Pom poms can also brighten up seasonal decor‚ such as Christmas ornaments‚ Easter egg displays‚ or Halloween decorations. For a cozy vibe‚ attach them to throw blankets or create a pom-pom trimmed tablecloth. With the Clover Pom Pom Maker‚ you can craft custom sizes and colors to match your home’s aesthetic‚ making every space feel personalized and charming.
Crafting Accessories with Pom Poms
Elevate your accessories with vibrant pom poms! Add them to hats‚ scarves‚ or bags for a stylish touch. Use the Clover Pom Pom Maker to craft custom sizes and colors‚ perfect for embellishing keychains‚ hair clips‚ or jewelry. Pom poms also make great additions to footwear‚ creating unique shoelace charms. For a personalized look‚ attach them to belts or gloves. With this tool‚ you can easily create professional-looking accessories that stand out. Experiment with different yarn textures and colors to match your personal style‚ making every accessory truly one-of-a-kind and eye-catching.
The Clover Pom Pom Maker simplifies crafting‚ allowing you to create fluffy‚ professional-looking pom poms effortlessly. Perfect for DIY projects‚ it brings creativity to life with ease and precision.
Final Thoughts on Using the Clover Pom Pom Maker
The Clover Pom Pom Maker is an essential tool for crafters‚ offering simplicity and efficiency in creating professional-quality pom poms. Its innovative design ensures consistent results‚ making it perfect for various projects‚ from home decor to fashion accessories. With sharp scissors and a strong knot‚ you can achieve durable and attractive pom poms. Whether you’re a beginner or an experienced crafter‚ this tool enhances your creativity‚ allowing you to explore endless possibilities with yarn. It’s a must-have for anyone looking to elevate their DIY craft projects effortlessly.